SSH to Raspberry Pi remotely is an essential skill for anyone working with this versatile device. Whether you're a developer, hobbyist, or IT professional, the ability to access your Raspberry Pi from anywhere can significantly enhance your productivity and flexibility. In this article, we'll explore how to set up and use SSH for remote access, covering everything from basic configurations to advanced troubleshooting techniques.
As technology continues to evolve, the demand for remote access solutions has grown exponentially. With SSH (Secure Shell), you can securely connect to your Raspberry Pi from any location, making it an invaluable tool for managing servers, running scripts, or even automating tasks. This guide will walk you through the process step-by-step, ensuring that even beginners can achieve seamless remote access.
Whether you're setting up a home automation system, running a web server, or experimenting with IoT projects, understanding how to SSH to Raspberry Pi remotely is a critical skill. By the end of this article, you'll have the knowledge and tools necessary to configure and troubleshoot SSH connections effectively.
Read also:Denzel Washington Debunking The Rumors Ndash Is He Still Alive
Table of Contents
- What is SSH?
- Raspberry Pi Overview
- Enabling SSH on Raspberry Pi
- Connecting Remotely
- Using SSH Clients
- Securing Your SSH Connection
- Troubleshooting Common Issues
- Advanced SSH Configurations
- Alternative Remote Access Methods
- Conclusion
What is SSH?
SSH, or Secure Shell, is a network protocol designed to provide secure communication between two devices over an unsecured network. It is widely used for remote administration and command execution. By encrypting data during transmission, SSH ensures that sensitive information, such as passwords and commands, remains private and secure.
SSH operates on port 22 by default and supports various authentication methods, including password-based and public-key authentication. This flexibility makes SSH a popular choice for remote access solutions, especially in environments where security is paramount.
Raspberry Pi Overview
The Raspberry Pi is a compact, affordable single-board computer that has gained immense popularity among developers, educators, and hobbyists. Its versatility and ease of use make it ideal for a wide range of applications, from home automation to robotics and beyond.
One of the key features of the Raspberry Pi is its ability to run a variety of operating systems, including Raspbian, Ubuntu, and others. This flexibility allows users to tailor the device to their specific needs, whether they're building a media center, running a web server, or experimenting with IoT projects.
Key Features of Raspberry Pi
- Compact size and low power consumption
- Support for multiple operating systems
- Extensive community support and resources
- Compatibility with a wide range of peripherals
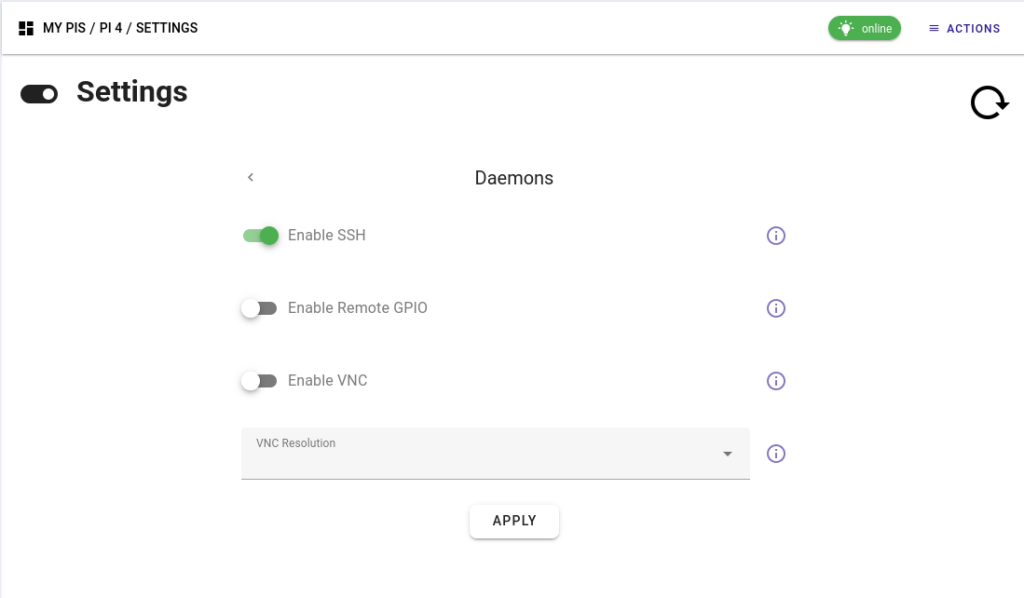
Enabling SSH on Raspberry Pi
Before you can SSH to Raspberry Pi remotely, you need to enable the SSH service on your device. In recent versions of Raspberry Pi OS, SSH is disabled by default for security reasons. However, enabling it is a straightforward process.
Method 1: Using the Raspberry Pi Configuration Tool
One of the easiest ways to enable SSH is by using the Raspberry Pi Configuration tool. Follow these steps:
Read also:Luke Combs Political View Unveiling The Truth Behind The Country Stars Beliefs
- Open the terminal on your Raspberry Pi.
- Type
sudo raspi-configand press Enter. - Select "Interfacing Options" and navigate to "SSH".
- Choose "Yes" to enable SSH and exit the configuration tool.
Method 2: Creating an SSH File
If you don't have access to the Raspberry Pi's graphical interface, you can enable SSH by creating an empty file named "ssh" on the boot partition. Simply insert your SD card into your computer, navigate to the boot directory, and create the file. Once the SD card is reinserted into the Raspberry Pi, SSH will be enabled automatically.
Connecting Remotely
Once SSH is enabled on your Raspberry Pi, you can connect to it remotely using a variety of methods. The most common approach is to use an SSH client, which allows you to establish a secure connection from another device.
Step-by-Step Guide
Follow these steps to connect to your Raspberry Pi remotely:
- Ensure your Raspberry Pi is connected to the same network as your client device.
- Find the IP address of your Raspberry Pi by typing
hostname -Iin the terminal. - On your client device, open an SSH client and enter the command:
ssh pi@. - Enter the password when prompted (default is "raspberry" unless changed).
Using SSH Clients
There are several SSH clients available, each with its own set of features and capabilities. Some popular options include:
1. PuTTY (Windows)
PuTTY is a free and widely-used SSH client for Windows. It provides a simple interface for connecting to remote devices and supports various authentication methods.
2. Terminal (macOS/Linux)
macOS and Linux users can use the built-in terminal to connect to their Raspberry Pi. Simply open the terminal and enter the SSH command as described earlier.
3. MobaXterm (Cross-Platform)
MobaXterm is a powerful SSH client that offers advanced features such as X11 forwarding and file transfer capabilities. It's an excellent choice for users who require more functionality than basic SSH clients provide.
Securing Your SSH Connection
While SSH is inherently secure, there are additional steps you can take to enhance the security of your connection:
- Change the Default Password: Ensure that the default "raspberry" password is replaced with a strong, unique password.
- Use Public-Key Authentication: Configure SSH to use public-key authentication instead of passwords for added security.
- Disable Root Login: Prevent direct root access via SSH to minimize the risk of unauthorized access.
- Change the Default Port: Modify the SSH port from the default 22 to a non-standard port to reduce the likelihood of brute-force attacks.
Troubleshooting Common Issues
Even with proper configuration, issues can arise when trying to SSH to Raspberry Pi remotely. Here are some common problems and their solutions:
1. Connection Refused
This error typically occurs when SSH is not enabled or the Raspberry Pi is not connected to the network. Ensure that SSH is enabled and verify the IP address.
2. Permission Denied (Public Key)
If you're using public-key authentication, ensure that your public key is correctly added to the ~/.ssh/authorized_keys file on the Raspberry Pi.
3. Timeout Errors
Timeout errors can be caused by network issues or firewall restrictions. Check your network settings and ensure that the necessary ports are open.
Advanced SSH Configurations
For advanced users, there are several configurations that can enhance the functionality and security of SSH:
1. Configuring SSH Tunnels
SSH tunnels allow you to securely forward traffic between devices. This can be useful for accessing services running on your Raspberry Pi from a remote location.
2. Setting Up SSH Keys
Public-key authentication eliminates the need for passwords, making it a more secure and convenient method for accessing your Raspberry Pi.
3. Enabling Two-Factor Authentication
Adding an extra layer of security through two-factor authentication can significantly reduce the risk of unauthorized access.
Alternative Remote Access Methods
While SSH is the most common method for remote access, there are other options available:
1. VNC (Virtual Network Computing)
VNC allows you to access the graphical interface of your Raspberry Pi remotely. This can be useful for tasks that require a graphical environment.
2. Web-Based Interfaces
Some applications, such as Home Assistant, provide web-based interfaces that can be accessed remotely without the need for SSH.
Conclusion
SSH to Raspberry Pi remotely is a powerful tool that can enhance your ability to manage and interact with your device. By following the steps outlined in this guide, you can configure and secure your SSH connection effectively. Remember to always prioritize security and consider using advanced configurations to further enhance the functionality of your setup.
We encourage you to share your experiences and ask questions in the comments section below. Additionally, feel free to explore other articles on our site for more tips and tricks related to Raspberry Pi and other technologies.
Data Sources: