Accessing your Raspberry Pi device from anywhere using SSH is a powerful tool for remote management and troubleshooting. Whether you're a developer, hobbyist, or IT professional, understanding SSH can significantly enhance your ability to manage remote systems. In this comprehensive guide, we will explore everything you need to know about setting up and using SSH with your Raspberry Pi.
Secure Shell (SSH) is a cryptographic protocol designed to provide secure communication over an unsecured network. It allows users to remotely control and manage devices without compromising security. For Raspberry Pi users, SSH enables access to the device's terminal from any location, making it easier to maintain and update the system.
Throughout this article, we will delve into the setup process, configuration options, troubleshooting tips, and best practices for securing your Raspberry Pi when using SSH. By the end of this guide, you will have the knowledge and tools necessary to remotely access your Raspberry Pi confidently and securely.
Read also:Rebecca Pawn Stars The Rising Star In The World Of Antiques And Collectibles
Table of Contents
- Introduction to SSH
- Raspberry Pi Overview
- Enabling SSH on Raspberry Pi
- Connecting to Raspberry Pi via SSH
- Securing Your SSH Connection
- Troubleshooting Common SSH Issues
- Advanced SSH Configurations
- Accessing Raspberry Pi from Anywhere
- Best Practices for SSH
- Conclusion and Next Steps
Introduction to SSH
SSH, or Secure Shell, is a network protocol that provides secure communication between two computers. It is widely used for remote access to servers, routers, and other devices, including the Raspberry Pi. SSH encrypts all data transmitted between the client and server, ensuring privacy and integrity.
Why Use SSH?
- Secure communication over untrusted networks
- Remote command execution and file transfer
- Easy to set up and use
- Supports authentication methods like passwords and public keys
SSH is particularly useful for Raspberry Pi users who need to manage their devices remotely. Whether you're configuring a home server, setting up a media center, or running IoT projects, SSH provides the flexibility and security needed for remote access.
Raspberry Pi Overview
The Raspberry Pi is a small, affordable computer that can be used for a variety of purposes, from learning programming to running complex applications. Its versatility and affordability make it a popular choice for hobbyists, educators, and professionals alike.
Key Features of Raspberry Pi
- Compact size and low power consumption
- Support for multiple operating systems, including Raspbian and Ubuntu
- Extensive community support and documentation
- Compatibility with a wide range of peripherals and accessories
For remote management, the Raspberry Pi offers built-in support for SSH, making it easy to connect and manage the device from anywhere in the world.
Enabling SSH on Raspberry Pi
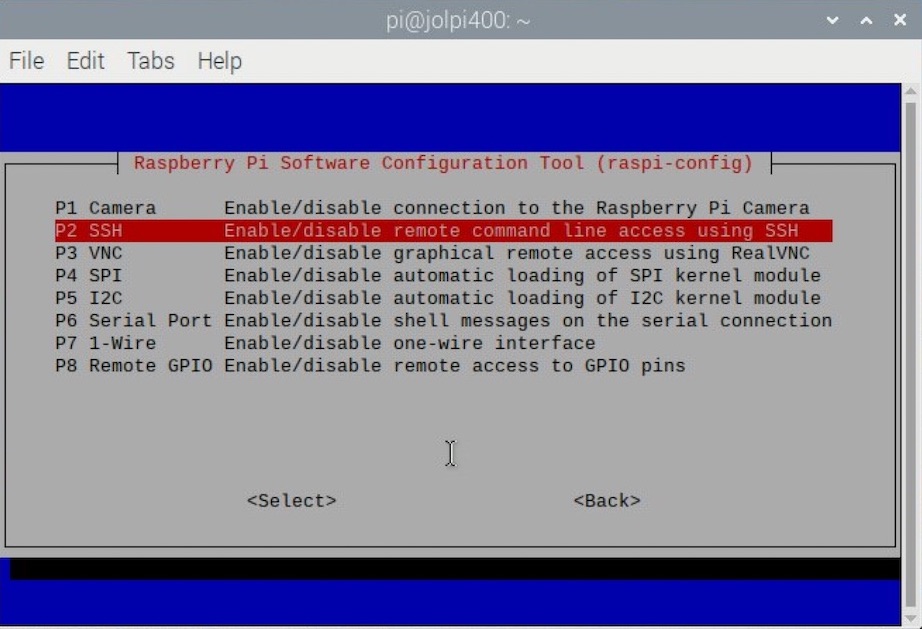
Before you can access your Raspberry Pi via SSH, you need to ensure that SSH is enabled on the device. By default, SSH is disabled on most Raspberry Pi operating systems for security reasons. Follow these steps to enable SSH:
- Power on your Raspberry Pi and log in to the operating system.
- Open the Raspberry Pi Configuration tool by typing
sudo raspi-configin the terminal. - Select "Interfacing Options" and navigate to the SSH option.
- Choose "Enable" and exit the configuration tool.
Alternatively, you can enable SSH by creating an empty file named "ssh" on the boot partition of the SD card. This method is particularly useful if you don't have access to the Raspberry Pi's graphical interface.
Read also:Does Rachel Maddow Have Children Exploring The Personal Life Of A Prominent Journalist
Connecting to Raspberry Pi via SSH
Once SSH is enabled on your Raspberry Pi, you can connect to it using an SSH client. The most popular SSH client for Windows is PuTTY, while macOS and Linux users can use the built-in terminal application.
Connecting with PuTTY
- Download and install PuTTY from the official website.
- Open PuTTY and enter the Raspberry Pi's IP address in the "Host Name" field.
- Select "SSH" as the connection type and click "Open."
- Enter your Raspberry Pi's username and password when prompted.
Connecting with Terminal
- Open the terminal application on your Mac or Linux computer.
- Type
ssh username@raspberrypi.local, replacing "username" with your Raspberry Pi's username. - Enter the password when prompted.
Once connected, you will have access to the Raspberry Pi's terminal, where you can execute commands and manage the system.
Securing Your SSH Connection
While SSH provides a secure connection by default, there are additional steps you can take to enhance security and protect your Raspberry Pi from unauthorized access.
Use Strong Passwords
Ensure that your Raspberry Pi's username and password are strong and unique. Avoid using common passwords or easily guessable information.
Disable Root Login
By default, most SSH servers allow root login, which can be a security risk. To disable root login, edit the SSH configuration file:
- Open the terminal and type
sudo nano /etc/ssh/sshd_config. - Find the line
PermitRootLogin yesand change it toPermitRootLogin no. - Save the file and restart the SSH service using
sudo service ssh restart.
Enable Public Key Authentication
Public key authentication provides a more secure alternative to password-based authentication. To enable it:
- Generate a public/private key pair on your local machine using
ssh-keygen. - Copy the public key to your Raspberry Pi using
ssh-copy-id username@raspberrypi.local. - Test the connection by logging in without entering a password.
Troubleshooting Common SSH Issues
Despite its reliability, SSH connections can sometimes encounter issues. Below are some common problems and their solutions:
Connection Refused
If you receive a "Connection refused" error, ensure that:
- SSH is enabled on the Raspberry Pi.
- The IP address or hostname is correct.
- Firewall rules allow SSH traffic on port 22.
Permission Denied
A "Permission denied" error usually indicates an authentication issue. Check the following:
- Your username and password are correct.
- Public key authentication is properly configured.
- SSH is allowed in the Raspberry Pi's configuration file.
Advanced SSH Configurations
For advanced users, SSH offers a range of customization options to enhance functionality and security. Below are some examples:
Change Default SSH Port
Changing the default SSH port can help reduce brute-force attack attempts. To do this:
- Edit the SSH configuration file:
sudo nano /etc/ssh/sshd_config. - Find the line
Port 22and change it to a different port number (e.g., 2222). - Restart the SSH service:
sudo service ssh restart.
Set Up SSH Tunneling
SSH tunneling allows you to securely forward traffic from one port to another. This is useful for accessing services running on the Raspberry Pi from a remote location.
- Open the terminal and type
ssh -L local_port:destination_host:destination_port username@raspberrypi.local. - Replace the placeholders with the appropriate values for your setup.
Accessing Raspberry Pi from Anywhere
To access your Raspberry Pi from anywhere in the world, you need to configure port forwarding on your router and ensure that your Raspberry Pi has a static IP address.
Set Up Port Forwarding
- Log in to your router's web interface.
- Find the port forwarding settings and add a new rule.
- Set the external port to the SSH port (default is 22) and the internal IP address to your Raspberry Pi's address.
Use a Dynamic DNS Service
If your internet service provider assigns dynamic IP addresses, consider using a dynamic DNS service like No-IP or DuckDNS. These services provide a consistent domain name for your Raspberry Pi, even if the IP address changes.
Best Practices for SSH
Following best practices for SSH can help ensure a secure and reliable connection. Below are some recommendations:
- Regularly update your Raspberry Pi's operating system and SSH software.
- Monitor SSH logs for suspicious activity using
sudo tail -f /var/log/auth.log. - Limit SSH access to trusted IP addresses using firewall rules.
- Use a strong firewall configuration to protect against unauthorized access.
Conclusion and Next Steps
In this comprehensive guide, we have explored the process of accessing your Raspberry Pi device from anywhere using SSH. From enabling SSH to securing your connection and troubleshooting common issues, you now have the tools and knowledge needed to manage your Raspberry Pi remotely.
To further enhance your skills, consider exploring advanced topics such as SSH tunneling, automated backups, and setting up a home server. By leveraging the power of SSH, you can unlock the full potential of your Raspberry Pi and take your projects to the next level.
Feel free to leave a comment below with any questions or suggestions. Don't forget to share this article with others who may find it useful, and explore our other guides for more tips and tricks on using your Raspberry Pi.