With the rise of IoT (Internet of Things), Raspberry Pi has emerged as a revolutionary tool for creating smart, connected devices. Whether you're a hobbyist, developer, or tech enthusiast, leveraging a free Raspberry Pi remote control IoT app can transform the way you interact with your projects. This article will delve into everything you need to know about setting up, customizing, and optimizing your Raspberry Pi for remote control applications.
Raspberry Pi offers endless possibilities for innovation, from home automation to industrial applications. By integrating a remote control IoT app, you can manage and monitor your devices from anywhere in the world. In this guide, we'll explore the best free apps, setup processes, troubleshooting tips, and more to help you harness the full potential of your Raspberry Pi.
Whether you're new to Raspberry Pi or an experienced user, this comprehensive article will provide you with the knowledge and tools needed to build a powerful remote control system. Let's dive in and unlock the potential of your IoT projects today!
Read also:Charlie Sheen Alive Unveiling The Truth Behind The Legend
Table of Contents
- Introduction to Raspberry Pi
- Why Use a Remote Control IoT App
- Best Free IoT Apps for Raspberry Pi
- Setting Up Your Raspberry Pi
- Configuring a Remote Control System
- Troubleshooting Common Issues
- Optimizing Your IoT App
- Advanced Features and Customizations
- Security Best Practices
- Conclusion and Next Steps
Introduction to Raspberry Pi
Raspberry Pi is a compact, affordable computer designed for learning and experimentation. Since its release in 2012, it has become a favorite among developers, educators, and hobbyists worldwide. The device's versatility allows users to create a wide range of projects, from media centers to complex IoT systems.
Key Features of Raspberry Pi
- Compact and lightweight design
- Support for multiple operating systems
- Built-in connectivity options (Wi-Fi, Bluetooth)
- Extensive GPIO pins for hardware integration
With its low cost and robust capabilities, Raspberry Pi has become a cornerstone of modern IoT development. By pairing it with a free Raspberry Pi remote control IoT app, you can enhance its functionality and expand its reach.
Why Use a Remote Control IoT App
A remote control IoT app allows you to manage and interact with your Raspberry Pi projects from anywhere. This capability is particularly useful for monitoring environmental conditions, controlling smart home devices, or managing industrial equipment. The convenience and flexibility offered by such apps make them indispensable for modern IoT setups.
Benefits of Using a Remote Control IoT App
- Real-time data access
- Remote device management
- Increased security and control
- Scalability for larger projects
By leveraging a free Raspberry Pi remote control IoT app, you can streamline your workflow and ensure seamless operation of your devices.
Best Free IoT Apps for Raspberry Pi
Several free IoT apps are available for Raspberry Pi, each offering unique features and functionalities. Below are some of the most popular options:
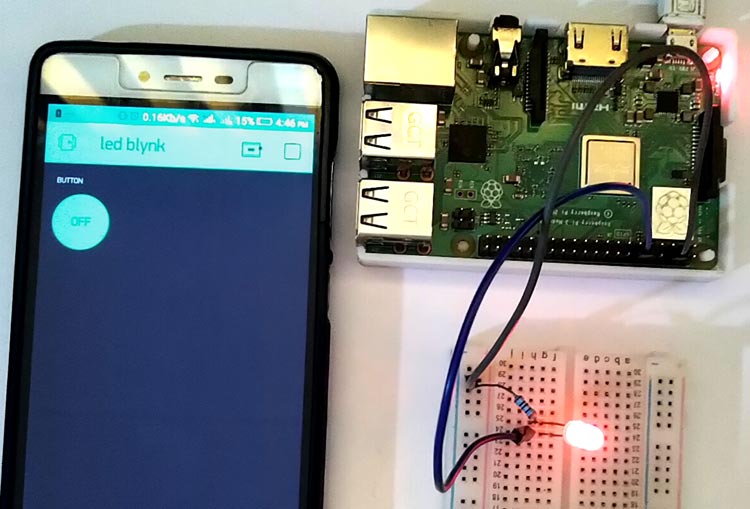
1. Blynk
Blynk is a user-friendly app that allows you to create custom dashboards for your Raspberry Pi projects. With its drag-and-drop interface, you can easily design interfaces for controlling lights, sensors, and other connected devices.
Read also:Why Do People Dislike Trump A Comprehensive Analysis
2. Home Assistant
Home Assistant is an open-source platform designed for home automation. It supports a wide range of integrations and can be used to control smart home devices remotely. Its community-driven development ensures regular updates and improvements.
3. Node-RED
Node-RED is a visual programming tool that simplifies the creation of IoT workflows. By connecting nodes, you can build complex systems for data processing, device control, and automation.
Setting Up Your Raspberry Pi
Before you can use a free Raspberry Pi remote control IoT app, you need to set up your device properly. Follow these steps to ensure a smooth installation process:
Step 1: Install the Operating System
Download the Raspberry Pi Imager tool and select the recommended operating system for your project. Write the image to an SD card and insert it into your Raspberry Pi.
Step 2: Connect to Wi-Fi
During the initial setup, configure your Wi-Fi settings to allow remote access. You can do this through the graphical interface or by editing the wpa_supplicant.conf file.
Step 3: Enable SSH
SSH (Secure Shell) is essential for remote management. Enable it by creating an empty file named "ssh" on the boot partition of your SD card.
Configuring a Remote Control System
Once your Raspberry Pi is set up, you can begin configuring your remote control system. This involves installing the chosen IoT app, setting up necessary libraries, and testing the connection.
Installing Blynk
To install Blynk on your Raspberry Pi, follow these steps:
- Create a Blynk account and download the app
- Install the Blynk library on your Raspberry Pi
- Connect your device to the Blynk server
Setting Up Home Assistant
Home Assistant can be installed using the HassOS image or as a Docker container. Configure integrations and automations to suit your specific needs.
Troubleshooting Common Issues
While setting up your Raspberry Pi remote control system, you may encounter various challenges. Below are some common issues and their solutions:
Issue 1: Connectivity Problems
If your Raspberry Pi cannot connect to the internet, check your Wi-Fi settings and ensure the correct credentials are entered.
Issue 2: SSH Not Working
Verify that SSH is enabled and ensure your firewall settings allow incoming connections on port 22.
Issue 3: App Compatibility
Ensure your chosen IoT app is compatible with your Raspberry Pi model and operating system. Refer to the official documentation for guidance.
Optimizing Your IoT App
To get the most out of your Raspberry Pi remote control IoT app, consider the following optimization tips:
1. Reduce Resource Usage
Minimize the load on your Raspberry Pi by disabling unnecessary services and optimizing your code.
2. Schedule Maintenance
Set up regular updates and backups to ensure your system remains stable and secure.
3. Monitor Performance
Use tools like htop or glances to monitor system performance and identify bottlenecks.
Advanced Features and Customizations
For users seeking more advanced functionality, several customizations can enhance your Raspberry Pi remote control IoT app:
1. Integration with AI Services
Connect your app to AI platforms like Google Assistant or Amazon Alexa for voice-controlled interactions.
2. Custom Dashboards
Create personalized dashboards using frameworks like Dash or Plotly to visualize your data effectively.
3. Automation Scripts
Develop scripts to automate repetitive tasks and improve efficiency in your IoT projects.
Security Best Practices
Security is paramount when dealing with IoT devices. Follow these best practices to protect your Raspberry Pi remote control system:
1. Use Strong Passwords
Create complex passwords for SSH and app accounts to prevent unauthorized access.
2. Enable Two-Factor Authentication
Implement two-factor authentication for added security on your remote control app.
3. Regularly Update Software
Keep your operating system and apps up to date to patch vulnerabilities and improve performance.
Conclusion and Next Steps
In conclusion, a free Raspberry Pi remote control IoT app can significantly enhance your projects by providing remote access and management capabilities. By following the steps outlined in this guide, you can set up, configure, and optimize your system for maximum efficiency and security.
We encourage you to experiment with different apps and customizations to find the perfect solution for your needs. Don't forget to share your experiences and ask questions in the comments section below. For further reading, explore our other articles on Raspberry Pi and IoT development.
Thank you for reading, and happy tinkering!